Before you begin
Equipment needed for this job:
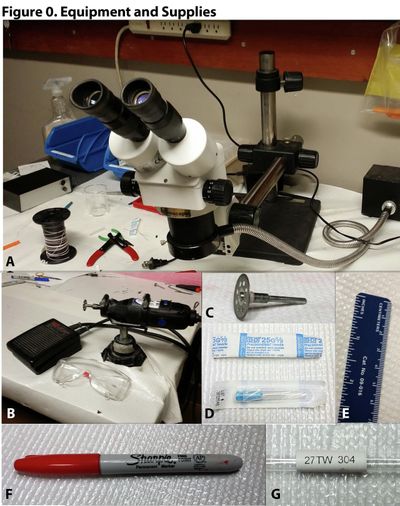
- Stereo Microscope or similar magnifier (Fig 0A)
- Table-mounted DremelTM or equivalent motorized rotary tool (Fig 0B)
Supplies needed for this job:
- Diamond cutting wheel (Fig 0C)
- 25G 5/8 Hypodermic needle or similar (Fig 0D)
- Metric ruler (Fig 0E)
- SharpieTM or similar permanent marker (Fig 0F)
- Type 304 Stainless Steel Tubing, 27G, .016010" ID, .010016" OD, .003" Wall (Fig 0G)
Procedures
Guide tubes should be cut to four different lengths: 2.5" , 2.75" , 3.0" and 3.25" (using different lengths makes it easier to join the targeting cone to the drive core at a later step). Each targeting cone should be built to contain an approximately equal number of guide tubes of each length. For example, a drive that contains 36 guide tubes in all will be constructed using 9 guide tubes of each length. Perform the following steps to cut each of the guide tubes:
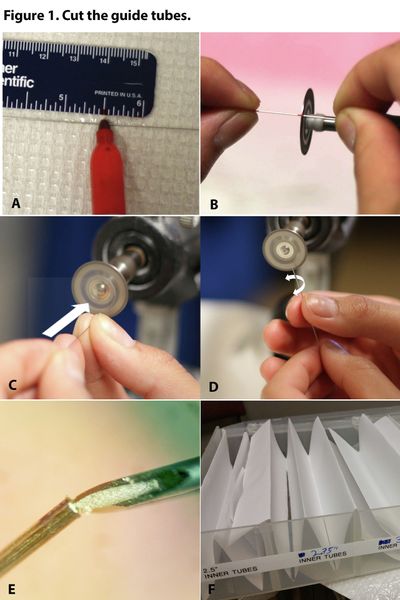
- Mark lengths (Fig 1A). Once you have chosen lengths for the guide tubes, use a ruler and a permanent marker to mark where your stock tubing needs to be cut to achieve the desired lengths. If you are planning to cut tubes to all four lengths (which is usually the case), you should start with the longest (3.25") and go on to progressively shorter lengths, for reasons explained below (see step #5).
- Cut the guide tubes (Fig 1B). Put on your safety goggles, and use a rotary tool with a diamond cutting wheel to cut the stock tubing at each mark you made in step 1. Set the wheel to a high rotation speed for the cleanest cut.
- Flatten the guide tube ends (Fig 1C). Flatten each end of the guide tube by pressing it gently against the surface of the cutting wheel (white arrow), at a 90 degree angle to the wheel. A high rotation speed will give the smoothest finish.
- Bevel the tube ends (Fig 1D), Very gently hold the tube near one of its ends between the thumb and forefinger of your non-dominant hand, and then grasp the tube lower down (farther from the end) with your dominant hand. Set the cutting wheel on low speed, and bring the end of the tube near the cutting wheel (parallel to its surface). Gently roll the end of the tube against the surface of the cutting wheel (white arrow) by rubbing the thumb and forefinger of your dominant (bottom) hand against one another, so that the tube twirls loosely between the thumb and forefinger of your non-dominant (top) hand. Do NOT sharpen the end of the guide tube to a point; just smooth the exterior of the tube so that it has no burrs or jagged edges. Repeat this step for the other end of the tube. Repeat steps 2-4 for multiple tubes before moving on to the next step.
- Check for straightness (no figure shown). After you have cut a set of tubes that are all the same length, you should inspect them for straightness. This can be done by aligning several tubes next to each other on a flat surface, and then rolling them gently under your finger to see that they are not warped or bent. Tubes that pass the striaghtness test can advance to step #6. For tubes that fail, if they are bent near the end, it may be able to go back to step #2 and cut them down to a shorter length, after which they might pass the straightnes test. This is why it is best to start cutting the longer tubes, and work your way down to the shorter ones.
- Open the holes in the tube at each end (Fig 1E). Under magnification, twirl the tip of a syringe needle (25 5/8 G works well) in the hole at each end of the tube you have just cut, to remove any metal shavings that are clogging the hole.
- Store the cut guide tubes by length until needed (Fig 1F). Stock guide tubes of each length in a safe place so that they will be available when needed to build a targeting cone.