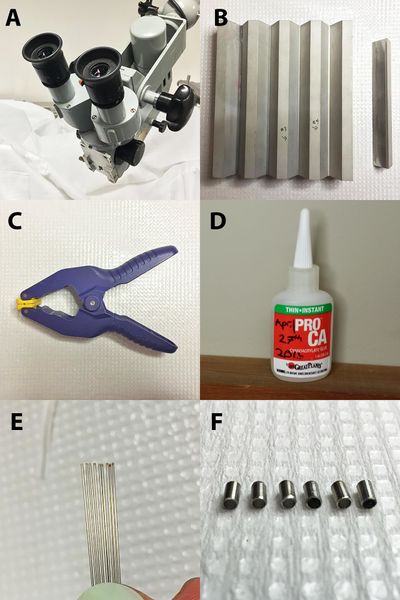
Equipment and Supplies
Equipment needed for this job (7x & 9x bundles only):
- Stereo Microscope or similar magnifier (Fig 0A)
- Guide tube bundling die (Fig 0B) – click here for build instructions
- Spring clamp (Fig 0C)
Supplies needed for this job (4x, 7x, & 9x bundles):
- Cyanoacrylate glue (Fig. 0D)
- Guide tubes (Fig 0E) – click here for build instructions
- Guide tube bundle collars (Fig 0F) – click here for build instructions
9x collar: 13G, .095" OD, .071" ID, .012" Wall (McMaster-Carr 8988K32)
7x collar: 16.5G, .062" OD, .052" ID, .005" Wall (McMaster-Carr 8988K36)
4x collar: 17G, .058" OD, .042" ID, .008" Wall (McMaster-Carr 8988K45)
Figure 0. Equipment and Supplies
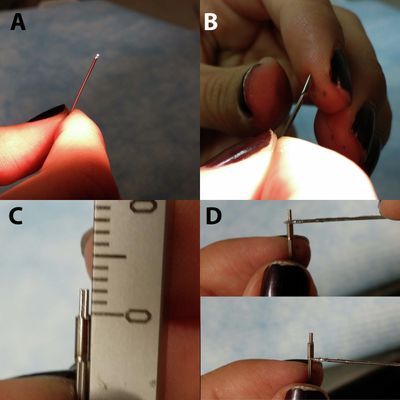
4x guide tube bundle
- Bundle the guide tubes (Fig 1A). Pick up the 4 guide tubes that will form the bundle, and make sure they are all straight (replace any bent tubes). Hold them parallel to one another, gripping them firmly between your thumb and forefinger so that about 3 cm of tubing extends from your fingers.
- Slip the collar over the bundle (Fig 1B). Fit the 17G 4x collar over the bundle of tubes. It will fit snugly and hold the tubes in a 2x2 configuration.
- Adjust the protrusion length (Fig 1C). The tips of the guide tubes (on the end that will enter the brain) should protrude from the collar by ~2 mm.
- Glue the collar to the tubes (Fig 1D). Use a non-absorbent applicator (such as an insect pin or syringe needle) to gently place a small amount of cyanoacrylate glue around the top and bottom edges of the collar. Be VERY careful not to use too much glue, because it may flow across the tubes and clog the holes in the guide tubes. Allow the glue to dry for at least 15 minutes. Then the 4x bundle is finished, and can be stored for later use.
Figure 1. Bundle 4x guide tubes
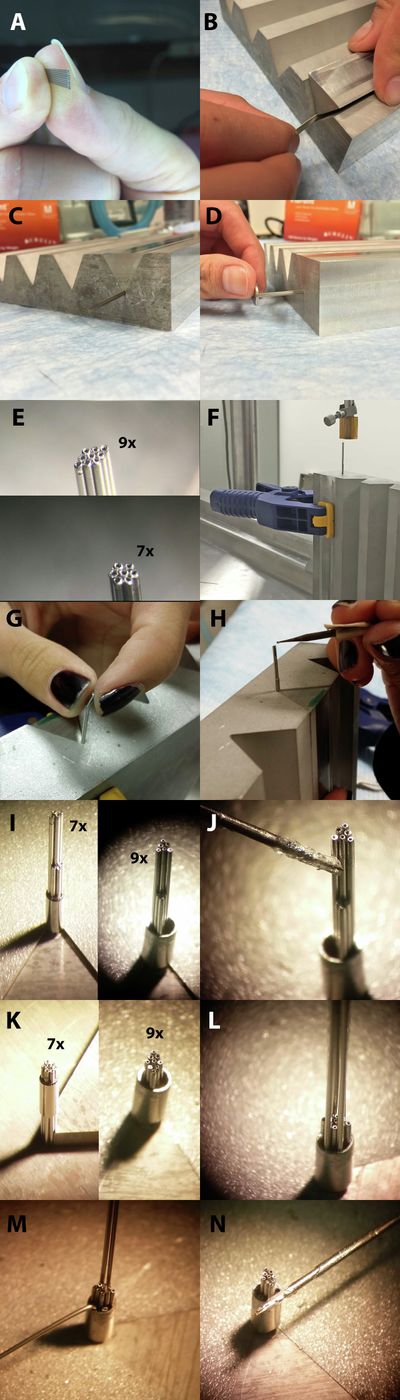
7x or 9x guide tube bundle
- Stack the guide tubes (Fig 2A). Pick up the set of 7 or 9 guide tubes that will form the bundle, and make sure they are all straight (replace any bent tubes). Stack them parallel to one another, gripping them firmly between your thumb and forefinger so that about 3 cm of tubing extends from your fingers.
- Bundle the stack in the die (Fig 2B). Hold the guide tubes so that they are stacked vertically (perpendicular to the tabletop). Align the tubes lengthwise so they they run parallel with the long V-notch in the bottom of either the 7x or 9x slot in the bundling die. Rest the bottom-most guide tube along the bottom of the trench in the V-notch (the tips of the tubes should only extend about 1 cm into the V-notch). With your free hand, pick up the triangular block and carefully align its grooved edge over topmost guide tube in the stack, so that the top tube is nestled into the groove. Gently rest the block into the V-notch, so that the guide tubes are shaped into a tight bundle.
- Inspect for gaps (Fig 2C). Upon inspection, there should be no spaces or crevices between the base of the die and the triangular block. Everything should fit snugly together. When the bundle is properly formed, the top of the triangular block should be perfectly flush with the top of the triangular bundling die along its entire length.
- Flush guide tube ends (Fig 2D). Using a hard flat surface (such as a knife blade or flat tweezer handle), flush the ends of the diamond by gently pushing or tapping them towards the die. Push the tubes in until their tips extend about 3 cm from the die.
- Inspect the tips of the bundle (Fig 2E). Under a microscope, inspect the flush ends of the tube to be sure they are tightly bundled into the desired shape (a diamond for 9x bundles, or a hexagon for 7x bundles). The ends should be flush and level, with each opening of the tubes clear of debris.
- Clamp the die and turn it upright (Fig 2F). Use a spring clamp to secure the triangular block into the V-notch. Do not shift the triangular piece in any way that would distort the shape of the diamondbundle. Then turn the bundling die on its side, so that the guide tube bundle extends tubes extend vertically from the top.
- Slip the collar over the bundle (Fig 2G). Fit the 16.5G (for 7x) or 13G (for 9x) collar over the guide tube bundle. The 7x collar will fit snugly (if it is too tight to get on, then use a dremel bit or other tool to ream out and widen the hole in the collar). The 9x collar will fit loosely for now, until is it tightened later (see below).
- Push down a subset of the guide tubes. Use a fine tool, such as a very small Dremel drill bit, to push down a subset of the guide tubes into the collar (Fig. 2H). You may need to loosen the spring clamp if the tubes do not move easily when you push them. For a 7x bundle, you should push down 3 of the 7 peripheral guide tubes, but NOT the center tube (Fig. 2I, left). For a 9x bundle, you should push down 3 tubes on a long end of the diamond, leaving the other 6 tubes up (Fig. 2I, right). The 'down' tubes should end up protruding ~5 mm from the collar, while the remaining 'up' tubes should protrude at least 10-15 mm from the collar.
- Glue the tubes in the 'up' position (Fig. 2H). Use a non-absorbent applicator (such as an insect pin or syringe needle) to apply a small amount of cyanoacrylate glue around the entire perimeter of the 'up' tubes. Gluing the 'up' tubes separately from 'down' tubes (which will be done in a later step) assures that glue can reach all tubes in the bundle (the middle tubes would not be accessible for gluing if all tubes were glued at once). Allow glue to dry for at least 15 minutes before continuing.
- Push down the 'up' tubes. Remove Gently remove the spring clamp from the bundling die, taking care not to move the triangular block or disturb the guide tube bundle as you do so. Lay the die back down on its side, and use a flat surface to gently tap the 'up' guide tubes into the die (as shown above in Fig. 2D, except now the collar is around the guide tube bundle) until the 'up' tips become flush with the 'down' tips. Continue to tap the entire bundle until all guide tube tips are flush with one another ~2 mm above the collar (Fig. 2K).
- 7x bundle: Glue the collar to the tubes. If you are making a 7x bundle, you may now glue the top and bottom of the collar to the tubes (as shown above for the 4x bundle in Fig. 1D), and wait 15 minutes for the glue to dry. The 7x bundle is then complete, and may be stored for later use. If you a are making 9x bundle, then DO NOT glue anything and go on to step 12.
- 9x bundle: Insert the filler the tubes (Fig. 2L). To make the loose collar snugly around the 9x bundle, insert four filler tubes into the empty spaces inside the collar. For this, you can use slightly bent guide tubes that were rejected for use in a bundle. The filler tubes should be several mm long for ease of handling.
- 9x bundle: Break off the filler tubes (Fig. 2M). One by one, bend each filler tube back and forth against the rim of the collar until it snaps off. Be careful when bending upward not to pull the filler tube out of the collar. When you are fnishedfinished, only four short nubs of filler tubing will remain inside the collar.
- 9x bundle: GLue Glue the collar to the tubes (Fig. 2N). First glue all around the top edge of the collar to secure the filler and guide tubes in place. Wait 15 minutes for the glue to dry, then remove the bundle from the die and glue around the bottom edge of the collar. The 9x bundle is then complete, and can be stored for later use.
Figure 2. Bundle 7x and 9x guide tubes