Versions Compared
compared with
Key
- This line was added.
- This line was removed.
- Formatting was changed.
efore
Before you begin
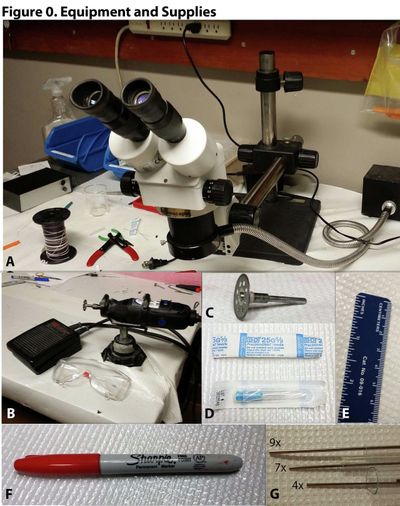
Equipment needed for this job:
- Stereo Microscope or similar magnifier (Fig 0A)
- Table-mounted DremelTM or equivalent motorized rotary tool (Fig 0B)
Supplies needed for this job:
- Diamond cutting wheel (Fig 0C)
- 25G 5/8 Hypodermic needle or similar (Fig 0D)
- Metric ruler (Fig 0E)
- SharpieTM or similar permanent marker (Fig 0F)
- Type 304 Stainless Steel Tubing, size depends upon bundle type:
9x bundle: 13G, .095" OD, .071" ID, .012" Wall (McMaster-Carr 8988K32)
7x bundle: 16.5G, .062" OD, .052" ID, .005" Wall (McMaster-Carr 8988K36)
4x bundle: 17G, .058" OD, .042" ID, .008" Wall (McMaster-Carr 8988K45)

Procedures
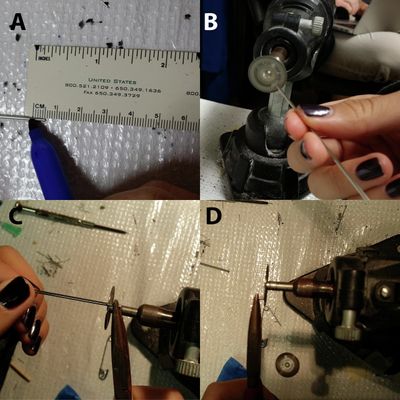
- Mark lengths (Fig 1A). Use a ruler and a permanent marker to mark where your stock tubing needs to be cut to achieve the desired length of 5.0 mm. All guide tube collars should be cut to 5.0 mm, regardless of whether you are using a 9x, 7x, or 4x bundle.
- Bevel the tube end before cutting it (Fig 1B), Very gently hold the tube near one of its ends between the thumb and forefinger of your non-dominant hand, and then grasp the tube lower down (farther from the end) with your dominant hand. Set the cutting wheel on low speed, and bring the end of the tube near the cutting wheel (parallel to its surface). Gently roll the end of the tube against the surface of the cutting wheel by rubbing the thumb and forefinger of your dominant (bottom) hand against one another, so that the tube twirls loosely between the thumb and forefinger of your non-dominant (top) hand. Do NOT sharpen the end of the guide tube to a point; just smooth the exterior of the tube so that it has no burrs or jagged edges.
- Cut the collar tube (Fig 1C). Put on your safety goggles, and use a rotary tool with a diamond cutting wheel to cut the stock tubing at each mark you made in step 1. Hold the short end of the collar with a tool (such as needle nose pliers) while you are cutting, so that the collar will not fly away when it is cut (and take care not to crush the tube by squeezing it too hard with the pliers). Set the wheel to a high rotation speed for the cleanest cut.
- Flatten the collar tube end (Fig 1D). Flatten each end of the collar tube by pressing it gently against the surface of the cutting wheel at a 90 degree angle to the wheel. A high rotation speed will give the smoothest finish.
Figure 1. Cutting the collar
