This module is designed to communicate with Neuropixels, or "Neuropix," probes from IMEC. The source code for the module can be found in neuropix-plugin repository and requires the neuropix branch of the GUI to run.
For more information on the Neuropixels probes themselves, check out this wiki set up by Nick Steinmetz of UCL.
Overview
This page contains a brief guide to configuring the Open Ephys GUI for use with IMEC Neuropixels Phase IIIA probes.
It is divided into 7 sections:
- Installing the software
- Connecting to the probe
- Setting probe parameters
- Visualizing continuous signals
- Acquiring and recording data
- Spike detection and audio monitoring
- Saving and loading signal chains
This guide assumes you’ve read IMEC’s Phase IIIA System User Manual and followed steps 1-8 in section 3.2 (FPGA configuration) and steps 1-8 in section 5.1 (connections and initialization). Also be sure to check that the gigabit ethernet card you’re using has its IP address set to 10.2.0.123 (as described in section 4.1)
There is a great deal of functionality to the Open Ephys GUI that is not described here. For more information, please refer to the Open Ephys wiki at https://open-ephys.atlassian.net/wiki/display/OEW/Open+Ephys+GUI
If you encounter any errors in this document or any bugs in the GUI, please contact Josh Siegle at joshs (at) alleninstitute (dot) org
1. Installing the software
The Windows executable can be downloaded from https://github.com/open-ephys-GUI-binaries/open-ephys/tree/neuropix.
It’s possible to download all the necessary files as a ZIP archive, using the “Download ZIP” button in the upper right. But we strongly recommend using the GitHub Desktop Client, so it’s easier to ensure you’re running the latest version.
To do this, install the GitHub Desktop Client found at https://desktop.github.com, then use the “Clone in Desktop” button to save a copy of the repository to your machine. Make sure the “neuropix” branch is active before you do so.
Any future software updates can be downloaded by pressing the “Sync” button inside the Desktop Client. The GUI will be updated frqeuently during the process of testing the probes, so make sure you’re using the latest version.
Inside the directory (called “open-ephys” or “open-ephys-neuropix” if you downloaded the ZIP file), you can run the application by launching open-ephys.exe. The executable must remain in this directory in order to access the associated DLL files, but you can create a link that resides else.
Note: We had to compile a 32-bit application because IMEC supplied a 32-bit library for communicating with the probes. If they eventually create a 64-bit library, we will switch to a 64-bit application.
2. Connecting to the probe
How signals flow through the GUI is determined by which processors comprise the signal chain. Each processor is largely independent from the others, so they can be mixed and matched to suit your experimental needs.
The “Neuropix” module is a Source processor, which means it brings data into the signal chain. Filters apply transformations to (or extract information from) data flowing from a source, while Sinks send data outside the signal chain (to a display, for example).
To acquire data from the IMEC probe, the first step is to drag and drop a Neuropix processor onto the signal chain. It will take a few seconds to connect to the basestation. Once it’s ready, an orange processor will appear. With this simple signal chain (a single processor), you’ll be able to record data, but not visualize it.
Note: If no basestation is connected, the GUI will search for ~20 s, then display a grayed-out processor.
![]()
3. Setting probe parameters
The parameters of the probe are set through a graphical interface. This can be accessed by clicking the “tab” button at the top of the Neuropix processor (to open it in the main GUI window) or the “window” button (to open it in a separate window).
![]()
Within this interface, you can use the image of the probe on the left to scroll up and down through the channels. Individual channels can be selected by clicking, or clicking and dragging to create a rectangle.
For Option III & IV probes, you can select which channels to acquire data from by clicking on those channels and pressing the ENABLE button. For every channel that is enabled (yellow), another channel is disabled (red). There will eventually be an option to disable the output of individual channels (using the ON/OFF buttons) so their data doesn’t flow through the signal chain, but this has not been implemented yet.
Use the four drop-down menus to set the AP gain, LFP gain, reference, and filter cutoff. Currently, these parameters are set globally. Changing any of these parameters takes approximately 1 second.
To load the probe’s gain calibration settings from EEPROM, press the ADC CALIBRATION and GAIN CALIBRATION buttons. This must be done every time the probe is powered on, and can take up to 10 minutes. The GUI will be frozen during this time, so please be patient! You’ll know it’s finished when the button icon changes color.
Within the Neuropix processor itself, you can toggle the trigger mode of the probe so it can be synchronized with other probes.
Internal trigger = acquisition starts is triggered by the GUI
External trigger = acquisition is triggered by the ‘EXT_START’ trigger line
For now, only internal triggering should be used.
You can also select whether to automatically stream data to an “NPX” binary file. You will be able to save data into a more convenient format using the GUI’s built-in recording functions, but it may be useful to write the raw data packets coming off of the probe for testing purposes. If recording is enabled (YES), a new file named recording#.npx will be written every time data acquisition is started (regardless of whether the GUI is recording data), where # indicates the number of times data acquisition has started since a connection was made to the basestation. These files can be overwritten, so make sure to rename or move them if you want them to be saved permanently.
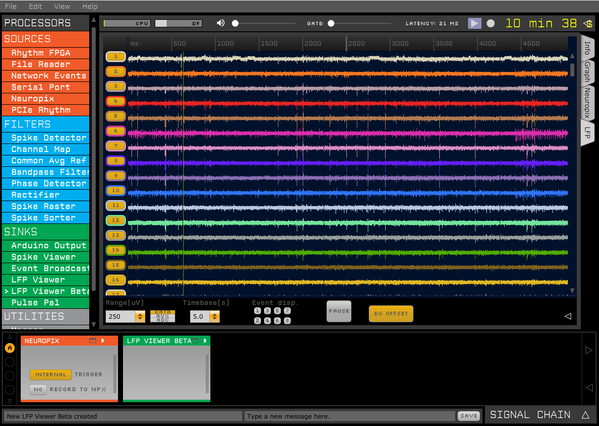
4. Visualizing continuous signals
To visualize the data coming off of the probe, drag and drop an LFP Viewer Beta to the right of the Neuropix source module. The "Beta" version is much more efficient than the original LFP Viewer, but we haven't made it the default yet because there are still some visualization glitches. But for the 768 channels of the Neuropixels probe, the extra efficiency is needed for the display to run smoothly.
Open the display by clicking the tab or window button at the top of the processor. All the data streaming from the Neuropix module will now be visible in the LFP Viewer. You can change the timebase, input range, channel spacing, or color scheme of the display. Extra options are exposed by clicking the arrow button. We recommend using an input range of 250 uV and a channel spacing (size) of 50 pixels. The "DC OFFSET" button will automatically subtract the constant voltage offset from each channel (for display purposes only).
5. Acquiring and recording data
To start acquisition, press the “acquire” (play) button in the GUI control panel. You should see the signals streaming through the LFP Viewer.
By default, all the data from the source node will be saved, but it’s also possible to save data at every point in the processing pipeline. This is necessary if you’re using the GUI to deliver any type of closed-loop feedback.
Before pressing the record button, open the recording parameters panel by clicking on the arrow at the far right of the control panel. Here, you can select the format and the recording directory. Once you press the record button, data will be saved into a folder with an auto-generated name. You can append or prepend a string to the folder name to specify, for example, your animal ID or experimental protocol.
The default format is the "Binary" format, which writes the data to a flat binary file of int16s in the form "ch1 sample 1, ch2 sample 1, ... ch384 sample 1, ch1 sample2, etc." There are separate files for the AP band (30 kHz) and LFP band (2.5 kHz). We recommend using this format because it's efficient and directly compatible with Kilosort. Events are saved in the 'all_channels.events" file. More info on the format can be found here. To convert from the stored int16 values to microvolts, simply multiply by 0.195.
We also recommend saving data to a directory on a solid-state drive, to improve disk writing efficiency.
Note: The GUI will occasionally crash if acquisition has been active for a long time before recording begins. To prevent this from happening, always stop and start acquisition prior to pressing the record button.
6. Saving and loading signal chains
You don’t have to re-build your signal chain every time you use the GUI. To save this signal chain for future use, press Ctrl-S (or use the File drop-down menu). Alternatively, you can select “Reload config on startup” from the File menu, and the GUI will automatically load the signal chain that was open the last time the application was used.
The Neuropix module writes the following information into the settings.xml file (saved each time recording is started)
- probe option and serial number
- probe AP gain, LFP gain, reference channel, and filter cutoff
- basestation version and API version
When loading a previously saved signal chain, the AP gain, LFP gain, reference channel, and filter cutoff will be restored to the previous settings. However, if you have enabled alternate channel configurations for an Option 3 and 4 probe, these are not currently saved or loaded.
Note: Connecting to and configuring the Neuropix probe takes a few seconds, so please be patient when loading saved signal chains that contain a Neuropix source module.
7. Other functionality
The GUI has many other capabilities, only some of which are compatible with the Neuropix source module. Feel free to play around with other processors, but expect to encounter crashes. If some functionality that you need appears to be missing, feel free to contact joshs (at) alleninstitute (dot) org for help and advice.