...
REMAP for Rearranging and deleting channels. To rearrange channels, click REMAP (it will become darker). You can then re-order channels by dragging. From the top left corner of the list, channels are shown in the ascending order (i.e. channel 1, 2, 3, ...). The values in the boxes refer to the numbers shown in the headstage channel mapping, specifying the pins/holes for headstage inputs. For example, in the example picture above channel 1 (the first on the left) with the value 2 means that it is connected to the pin/hole #2 of the headstage. In subsequent blocks, "channel 1" will refer to the first channel in the list (in the example picture above, channel 2). To delete channels, click REMAP and then double click on the channel to be suppressed (the suppressed channels are shown in gray background while active channels are shown with yellow color).
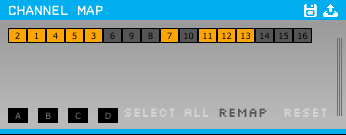
Reference banks A, B,C, and D for setting different reference electrodes for groups of channels.The "A", "B", "C", and "D" refer to different "reference banks" (ALERT: Do not confuse them with A, B, C, and D that appear on the right of Rhythm FGPA module, which represent "data streams" and have nothing to with A, B, C, and D on the Channel Map module; they are just badly named for now). To configure, pick one by clicking. Assign channels to that reference bank by clicking the channels above (the included channels are shown in yellow, whereas ones that are not included are shown in gray background). "SELECT ALL" will add all the channels at once to the current reference bank. Each channel can be assigned to only one reference bank. To select the reference electrode for the selected bank, click in the PARAM window, which will appear when you click the triple vertical bars at the right side of the panel. We've noticed occasional glitches when selections are made when the system is running, so it may be best to select only when system is stopped.
...