Programming and Using Cyclops r3.6
About this Guide
After reading this guide you will,
- Get to know all features of Cyclops rev. 3.6,
- Get to know the requirements and learn how to setup and test your Cyclops,
- Get to know the different ways in which the device can be used,
- Understand the components of the Teensy software and APIs.
Recommended reading after this guide:
- Usage with Open-Ephys GUI.
- Baremetal Usage, if you wish to program the Cyclops yourself and/or control the Cyclops from custom
C++orpythonscripts. - Developer documentation, for Library, API and Design reference (doxygen).
What's new in Cyclops 3.6
The new Cyclops is now controlled by Teensy 3.2, a powerful 32 bit ARM Cortex M4 CPU. The primary reason for choosing a Teensy over an Arduino was its superior clock speed and peripheral options. A more detailed discussion can be found in this GitHub issue.
- With the Teensy, it is possible to control up to 4 Cyclops Boards, while achieving a signal update rate of ~50 μsec, per LED channel.
- A new Remote Procedure Call interface (over USB) has been implemented, that let's you, Open-Ephys GUI or scripts in
C++andpythoncontrol the Teensy and all connected boards. - The (new) Open Ephys plugin-GUI provides native support for the Cyclops 3.6, letting you define "action-rules" on the GUI, and conduct closed loop optogenetic stimulation experiments.
Requirements
- Assembled Cyclops rev. 3.6 board(s) with a Teensy 3.2
- (Optional) Oscilloscope
The Teensy is flashed/programmed using the Teensyduino add-on for Arduino IDE. The Open-Ephys GUI can also flash programs (that it auto-generates) into the Teensy.
Installation
- Strictly follow this guide to install the Arduino IDE and Teensyduino. Also read the "Known Issues" section on the bottom of that page.
- Go through the "Getting Started" page to check if your software is setup correctly and that the Teensy works. You don't have to power up the Cyclops for this.
- To read the developer documentation locally, install
doxygenfor your PC. - Make sure you have
pythoninstalled (preferablypython 3.X). Also install:IPythonpython-scipy,python-numpy,python-matplotlib(if you haven't already)pyserial
All Teensy boards packaged with Cyclops have been tested.
Doxygen is an automatic documentation generator, which will build the documentation (we wrote) for you and place it in/docs/teensy.
Intended Usage
In all feedback loop systems, the stimulus is governed by a set of feedback transformation rules. These rules translate the observed phenomenon (or, behaviour) of the system (being stimulated), into modifications of the stimulus signal (hence providing feedback).
The Cyclops device only guarantees efficient delivery and modification of the stimulus signals, and since it cannot "monitor" neuronal circuits, it cannot "close" the feedback loop.
That means, system monitoring and analysis of the various monitored signals, as well as applying the feedback transformation rules to generate modifications of the stimulus, must happen elsewhere like the Open Ephys GUI, or some custom script that you write. These modifications must be forwarded to the Cyclops, in real-time.
For this, the Cyclops Library provides an RPC (Remote Procedure Call) interface over USB to communicate with the Teensy. It can be used to alter almost all aspects of the signal and its delivery in real-time for any number of Teensy boards (and hence any number of Cyclops Boards)!
Hence, there are 2 ways to use this library's RPC interface.
- Open Ephys GUI
- The RPC is baked into the
CyclopsStimulatorplugin. - Define transformation rules in
C++, that parse "Events" in the Open Ephys data-flow, and generates modification calls (via RPCC++API). - Virtually connect "rules" to a specific node in OE data-flow (processor graph) with the target Cyclops LED
channel.
So, all events up till this node would be fed to the "rules" and affect the target opticalchannel.
- Plug in Cyclops r3.6+
- Deploy.
- The RPC is baked into the
Baremetal
Write and flash a custom Arduino script on the Cyclops. Optionally connect with PC on USB, and control via custom
C++orpythonscript.
Alternative #1
is a flexible use-case and designed to support almost all kinds of Optogenetic experiments, and it lets you focus on your experiment and its results, rather than the nitty-gritty details of the Cyclops library.
If your use case requires more customisation, you might want to tweak the Cyclops Library. You can always request a feature, or help us build it!
Teensy programming
If you've already explored (hobbyist) embedded programming (of any kind) on any platform, you'll find the Teensy to be similar. There are some differences from an Arduino, chiefly the architecture. Teensy is based on ARM Cortex M4 while the Arduino is AVR based.
The Teensy device documentation is your best resource, second to the very mature Teensy forums.
- Interrupts are very different on ARM, and for someone transitioning from Arduino, it takes some time to understand the ("very powerful") Interrupt Vetor table and the Interrupt handler (which is just like any other function, not wrapped in
xxx_ISR(). - The device has a DMA controller. Sweet!
- Extended feature list is available on the Teensy website.
To get started with Teensy programming, go though the simple Tutorials first.
Also see this experimental feature guide, which explains how to tweak the OE code generation module.
Components of Cyclops
Optogenetic Stimulation involves delivery of optical signals.
So, for any experiment, you must specify the set of signals that may be delivered. >Cyclops supports delivery of arbitrary signals.
Each Cyclops Control program is composed of (atleast) 3 objects:
Source- A way to represent arbitrary waveforms in memory.
Board- An abstraction to the hardware functions and definitions (of pins, for example) on the Cyclops board.
Waveform- To bind Source signal and Board channel & functions
- This is the most important high level object
- Serial Interface (over USB) [optional]
- Imlpementation of the RPC.
- RPC Task Queue [optional]
- Processes incoming "tasks" in the most time-critical and efficient way.
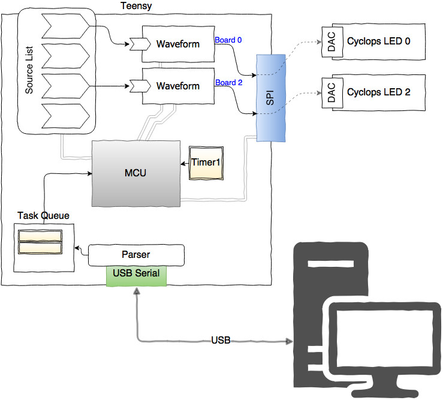
Thus, a Cyclops program only contains information about the Signals that might be used, using a global list of Source objects.
The Waveform object defines powerful methods to control everthing about the delivery of signals. It can even be used to change the output channel (LED) at runtime.
All the objects and their interconnections can be created and modified at runtime.
Caution
The Cyclops programs are interrupt driven, and if you want to edit or write programs that use Cyclops Objects, please read the developer documentation so that you can write safe programs which are protected from subtle Context Switch Bugs.
Next up: General Program Structure
A surface level walkthrough of an example.