/
Install the guide tube bundles
Install the guide tube bundles
- HT B
Owned by HT B
Last updated: Nov 13, 2015
Before you begin
Equipment needed for this job:
- Completed guide tube bundles (Fig 0A; click here for building instructions)
- Completed targeting cone (Fig 0B; click here for 3D printing instructions)
Supplies needed for this job:
- Pliers or forceps
- Holding cup for targeting cone
- Fresh tubes of two-part epoxy
- Mixing tray and spatula tool (wooden handles of cotton swabs work well) for 2-part epoxy
- Plunger tubes made from 4"-6" lengths of Type 304 Stainless Steel Tubing, with diameter of each collar matching that of the guide tube bundle that it will be used to insert:
9x bundle: 13G, .095" OD, .071" ID, .012" Wall (McMaster-Carr 8988K32)
7x bundle: 16.5G, .062" OD, .052" ID, .005" Wall (McMaster-Carr 8988K36)
4x bundle: 17G, .058" OD, .042" ID, .008" Wall (McMaster-Carr 8988K45)
Procedures
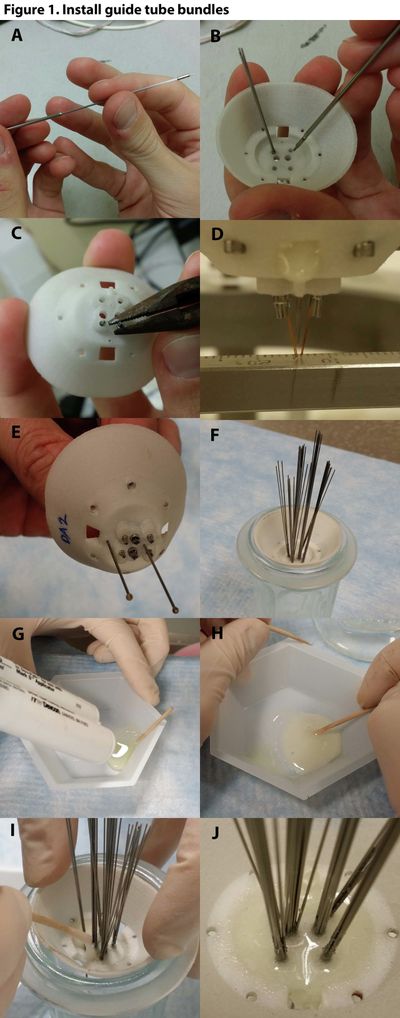
- Insert the bundle into the plunger tube (Fig 1A), Insert the long ends of the bundle guide tubes (those farthest from the collar end) into the plunger tube, and push them all the way in until the collar is flush (or nearly flush) with the plunger (as far as it will go in).
- Insert the bundle collar into the targeting cone (Fig 1B), Holding the plunger tube, insert the guide tube collar into its assigned hole in the targeting cone. Push it through the base until the guide tube tips extends 1.5-2.5 mm from the bottom of the cone (you can use the targeting cone design tool to help you decide the best length of the projection). You can either insert the guide tube bundle from the top side (i.e., inside) of the targeting cone (as shown in FIg. 1B), or from the bottom side (not shown), whichever is easier. In either case, you should try to insert the guide tube bundle as close to the proper orientation as possible, so that the next step (step 3) may not be necessary.
- Adjust the orientation of the guide tube bundle (Fig. 1C). If the orientation of the guide tubes is not quite accurate, then you can try to turn it to the proper orientation with a tool (like forceps or pliers). But be careful not to crimp the guide tube collar while you are doing this, or you may distort the shape of the guide tube bundle.
- Check the alignment of the guide tube bundles (Fig 1D). Repeat steps 1-3 until all guide tube bundles have been inserted into the targeting cone. Then follow the instructions under "check alignment of the guide tubes" to temporarily mount the targeting cone to a Drive Core, and check the alignment of the guide tubes on a stereotax. If any of the guide tubes are found to be misaligned, then repeat steps 1-3 as needed until the guide tube is aligned to yield the desired probe trajectories.
- Plug the sighting pin holes (Fig 1E). Insert sighting pins or some other stopper (insect pins are shown in the diagram) to plug the sighting pin holes from the bottom side. This will prevent the sighting pin holes from getting filled in by glue during the upcoming steps.
- Rest the targeting cone in a narrow cup (Fig 1F). While applying glue to secure the guide tube bundles, it is convenient to mount the targeting cone upright in a narrow cup-shaped holder of some kind.
- Dispense two-part epoxy (Fig 1G). Dispense two-part epoxy into a mixing dish in the appropriate ratio (usually 50% part A and 50% part B). It it VERY IMPORTANT to use fresh, new epoxy. Old epoxy that has been on the shelf for awhile can go stale (even if it has not yet passed its posted expiration date), and it will cure to a rubbery bathroom-caulk consistency that will not be strong enough to hold the guide tubes securely when the targeting cone is mated to the drive core. So again: USE FRESH EPOXY. If you are in doubt about the quality of your epoxy, then try to cure a sample of it overnight. It should cure into a glass-hard enamel that can firmly hold the guide tubes.
- Mix the epoxy (Fig. 1H). Mix the epoxy VERY VERY VERY THOROUGHLY for about 1 minute. When you are finished mixing, the epoxy should have a glossy appearance, with no trace of oiliness or graininess. Poorly mixed epoxy will not cure to the proper hardness, and you will be very unhappy when everything you have done up to this point has to be thrown out. So MIX THE EPOXY THOROUGHLY.
- Use a small spatula tool to apply epoxy to the guide tubes (Fig. 1I). Work quickly (before the epoxy starts to harden) to scoop small amounts of epoxy into the targeting cone. Allow the epoxy to flow around the guide tube bundles.
- Allow the epoxy to cure for 24 hours (Fig. 1J). Keep applying epoxy until the cavity in the bottom of the targeting cone is filled all the way up to its rim. Then set the targeting cone aside and allow the epoxy to cure overnight.
, multiple selections available,
Related content
Assemble the guide tube bundles
Assemble the guide tube bundles
More like this
Cut and store the guide tubes
Cut and store the guide tubes
More like this
Cut and store the bundle collars
Cut and store the bundle collars
More like this
Build the targeting cone
Build the targeting cone
More like this
3D Printing Instructions for the Targeting Cone
3D Printing Instructions for the Targeting Cone
More like this
4 - Assembling the drive body
4 - Assembling the drive body
More like this