/
Prepare targeting cone
Prepare targeting cone
- HT B
Owned by HT B
Last updated: Apr 25, 2015
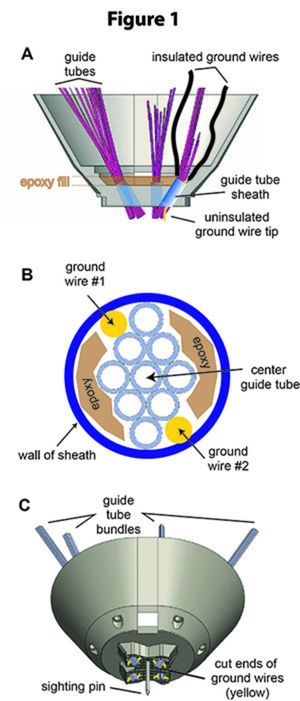
- Cleaning and lining the barrel holes. Each of the barrel holes in the bottom of the targeting cone is lined with a stainless steel guide tube sheath (Figure 1A). To make the sheath, insert a ~6” length of 13G stainless steel tubing (.095” OD, .077” ID) through one of the guide tube holes in the bottom of the targeting cone. Allow a short length (3 mm or so) of the tubing to protrude from the bottom of the cone, and use a cutting wheel to trim this protrusion off. When you are finished, the cut end of the stainless tube should be flush with the bottom surface at the base of the cone. The other end of the stainless tube protrudes from the pedestal into the targeting cone; mark this end ~1 mm above where it enters the pedestal. Remove the tube from the cone, cut it where marked, and then re-insert it into its prior position in the cone. The re-inserted sheath should now be flush against the bottom of the cone at one end, and extend about 1 mm into the cone at the other end (as in the diagram of Figure 4A). The tube should fit snugly into the pedestal without glue, but if it feels loose, it may be secured with glue (but make sure not to allow any glue into the barrel hole). Repeat this procedure to insert sheath liners into all of the other targeting cone holes before proceeding to the next step.
- Assembling guide tube bundles
- Insertion of ground wires
- Insertion of sighting pin
Related articles
, multiple selections available,
Related content
Build the targeting cone
Build the targeting cone
More like this
3D Printing Instructions for the Targeting Cone
3D Printing Instructions for the Targeting Cone
More like this
Construct the sighting pin
Construct the sighting pin
More like this
Prepare the Drive Core
Prepare the Drive Core
More like this
Cut and store the guide tubes
Cut and store the guide tubes
More like this
Assemble the guide tube bundles
Assemble the guide tube bundles
More like this